Monday, June 17, 2013

Design Wall Monday 6-17-13

Here's what was going on at retreat last weekend. 
My UFO Trip Around the World.  It started the weekend as 4 quadrants with different amount of rows.  I got the rows evened up, added additional rows to make it a rectangle and sewed it altogether.  I was checking the border at this point.  I decided to wait to add the border until I got home to make sure I had enough border to cover the mattress. This has been in the works for over 6 years.  

Nancy was making this cool top.  I loved how the colors worked togeher.  She got to the borders but I didn't get a picture of it. 

Kathleen was putting these units together.  I love all the polka dots.  She must have been collecting these for years! 

Sharon taught the group how to make the pinwheel block.  Everyone did great except for  Paula who was creative in her joining of the block.  But Sharon made a couple to match and used the different style block as a design unit.  I think I'd like to make a baby quilt with the alternate design and see what it looks like. 

Another cool top.  This might be Paula's but I'm only guessing based on the green shirt on the gal on the right.  


That's it for today about the retreat -- more later this week. 

I did pretty well on goals from two weeks ago .  Didn't have any from last week except to start cleaning off the cutting table. I did get a good start on that but the front side is already covered up with a new little project. 


Week of June 3
Finish thread holder
Finish heart and mail One is done but I want to make a few more
Cut extra fabrics for mytery quilt Didn’t happen!
Iron light blue fabric and batik
Organize and pack projects for retreat
Have lots of fun at retreat & get some sewing done
Visit the grands!

Week of June 17, 2013
Finish one or two little flag quilts
Make 2 more heart blocks
Finish flannel charity quilt
Make brown bag block
Begin working on a quilt from the 1800’s blocks
Pack up a box of books
Applique more orange peels

Take a look at design walls across the Internet by visiting Patchwork Times. 

Happy Quilting All! 

Saturday, June 15, 2013

A Small Lesson in Design

While at retreat last weekend I pulled out a batch of four patches -- white with different colors.  I had multiples of each color I used but not the same number of each.  As I was packing to leave I took a look at the stash and found a yard or so of fabric that I thought would go with it. Here's my attempt at laying out a quilt. 
 It was ok and used the 4 patches.  Let's get it together.  Well, one of the advantages of retreating is there are lots of opinionated quilters available.  And, they don't mind giving you suggestions.  Heck, I'm always giving suggestions at these types of events too!  So Paula wandered by and said, no, boring or something like that.  

She took over the pile of blocks and suggested this layout.  We were all surprised how much this simple change helped the overall design of the quilt. It didn't take all that long to sew the blocks together.   

Here it is all sewn together but obviously in need of a good pressing.  What I didn't realize until looking at these pictures is the go with fabric is directional. That won't make any difference in the big scheme of things.  Next up on this is to figure out the backing fabric.  I have fabric left over of most of the colors, some blocks and the go with fabric.  I guess I'll be piecing the backing too.  Now to figure out what binding to use.  Any suggestions?  I think I have enough of any of the colors I used.  This will be donated at some point.  


After retreat I went to see the grands and kids for a day or so.  Here's Sophia ready to go to day care.  She is a big fan of sunglasses and her Indiana University hat.  You're cool girl! 

Happy Quilting All! 

Thursday, June 13, 2013

Triangle Thursday #18


Ocean Way
This design is number 3163 in Barbara Brackman’s Encyclopedia of Pieced Quilt Patterns. Ohio Farmer published it in 1894. Click here for a printer ready version. 
Cutting directions are for 6”
Fabric
Number to cut
6”
Large Light Triangles
1
Cut a 5 ½” square, cut in half diagonally, use one
Large Dark Triangles
1
Cut a 5 ½” square, cut in half diagonally, use one
Light Little Triangles
4
Use 1 ½” template
Dark Little Triangles
4
Use 1 ½” template
Dark Print Little Triangles
6
Use 1 ½” template

We will be constructing the center in diagonal rows. Begin by making four half square triangles, in this block they are beige check and brown. Iron the seam toward the dark side.


Sew the dark print to a half square triangle block.  The center two squares will have a dark print triangle on the top and botton.  Iron toward the black.  Then sew the units together to create the diagonal center. Iron the seams away from the center.  I pinwheeled the center seam.

The next two seams are bias on both sides.  I carefully starched the two larger triangles to help control stretch.  Mark the centers of the triangles and both sides of the center piece.  Match up the centers and then sew. Iron seams to the large triangles.

When done, I trimmed the block to 6 ½”.  The large triangles are slightly big so you should have a bit to trim off.  


 Happy Quilting All! 

Thursday, June 6, 2013

Travel Time Minus 2 Hours

Yes! Thursday has arrived and I'm almost ready to travel north.  In a remarkable situation all of my sewing gear is packed and staged in the kitchen nook.  Its unheard of that I would be this far along and it was done last night.  Of course that doesn't mean I won't get there and say "oh no, I forgot ...."  I'll be leaving this morning sometime after 9 am in an attempt to miss rush hour on I 95.  

Here's what I've gotten done over the last few days. 
Here's my addition to the current Brown Bag Swap.  Remember the requirement was have a tool for us to use.  This one used Marti Michell's kaleidoscope ruler.  Very strange shape and lots of information on it that was very confusing at first but once I figured the lines out it was pretty easy to make this block.  Then I made a second one which I didn't photograph.  Below is everyone's blocks on the design wall. My second one would fill that hole really well.  Looks pretty good! 
I finally finished 26 thread catchers.  I'll be giving these to the gals who are on the retreat with me.  The pattern I used is from Robin Quilts, etc.  But I noticed today that another version is available at Needling Things.  I used the 12" size and I like the directions from Robin Quilts better.  She has you sew the flap down before you sew the edges together.  I also didn't like the points so I cut off about 1/2" from each point which meant I had to sew the corners but I liked the finished product better.  I quickly realized that I didn't have the time nor buttons to sew on 78 buttons so I found a solid oval shape from my fancy stitches on Bubbles and used that.  And, that went really fast except for changing threads.  I now have way too many odd colored bobbins. And, I busted about 5 yards of fabric doing this!  Waahoo! 


These blocks are going north with me.  The Bees group is now in the second year.  Heidi picked this block and provided us with 30's fabrics.  I threw a few of mine in also. Jenny and I will be meeting Heidi on Monday for lunch and fabric shopping.  
This one's for Sharon. She mentioned that the last photo of the attic finish was a gaping whole in the roof.  So, here's the shed dormer roof and under the Tyveck the walls are framed with 5, really, 5 windows.  When I get back from retreat I bet a lot more will be done. 

Time for me to pack my suitcase and get ready to travel!  I'm hoping I can post from the retreat center but I'm not holding my breath.  I'm not taking my laptop, just the iPhone and iPad.  

Happy Quilting All! 

Monday, June 3, 2013

Design Wall Monday 6-3-13

Here it is Monday again.  I've been sewing away on different stuff but what I want to show you is my finish of a new little project.  I got the embroidery module out and did this cute quilt saying.  Then I made it into a cover for Bubbles.  This was really easy to make with great directions.  Check out Purls and Pleats blog for the well written tutorial.  Here's what I learned making this one.  Don't use curtain lining -- it has wonderful drape but fabric should have more body for this cover.  I should have moved the design up a little farther on the front piece.  And, I was just a bit generous on the measurements.  This one could be a bit smaller and still work well.  But honestly, not a big deal.  I foresee a few more of these in the near future.  

I've got several other things in the works but I won't be sharing them until later. Darn, I hate having to keep secrets!  But I shall. 

Hey, I'm happy to report I did pretty well on my goals this week. 

Week of May 27, 2013

Finish small quilt top for swap
Mail swap quilt
Finish sewing down green binding
Make 1 triangle thread holder
Make June Brown Bag blocks
Wash new fabrics
Go to Penzy’s to pick up spices
Make and mail hearts to Quiltville Hearts group started

And, this coming week is going to be FUN!  

Week of June 3
Finish thread holders
Finish heart and mail
Make brown bag block and get to Colleen
Organize and pack projects for retreat
Travel safely
Have lots of fun at retreat & get some sewing done
Get Trip Around the World to a top
Get Bumble Bee to a top
Figure out 4 sq blocks and into a top 
Visit the grands!

I could add more details but I think that list suffices for this week.  I'm looking forward to having a ton of fun, getting some older projects to tops and visiting with my Maryland guild friends.  

Get on over to Judy's Patchwork Times to launch yourself all over the net to see Design Wall Mondays. 

Happy Quilting All 

Saturday, June 1, 2013

Stashbusting Statistics May & Studio

Welcome to June -- lovely warm weather although later this afternoon it might become HOT!  First up is my fabric usage during May.  Ok, so it was more fabric acquisition rather than usage.  I've been buying for specific needs for the most part.  This month's big buy was 3 yards for a border on a Trip Around the World Quilt.  I'm hoping to make it my main project on next week's retreat. 

2013
Fabric In
Month
Fabric In Year
Fabric Out Month
Fabric Out Year
Total In or Out Year
May
6.60
40.91
5.625
36.075
4.835 yd


Not bad considering my biggest finish was a baby quilt! But I did finish 2 small quilts.  One is winging its way to England so no pictures until after Ms. Val receives it. It was made for a quilt swap on Small Quilt Chat yahoo group run by Kathy Tracy.  

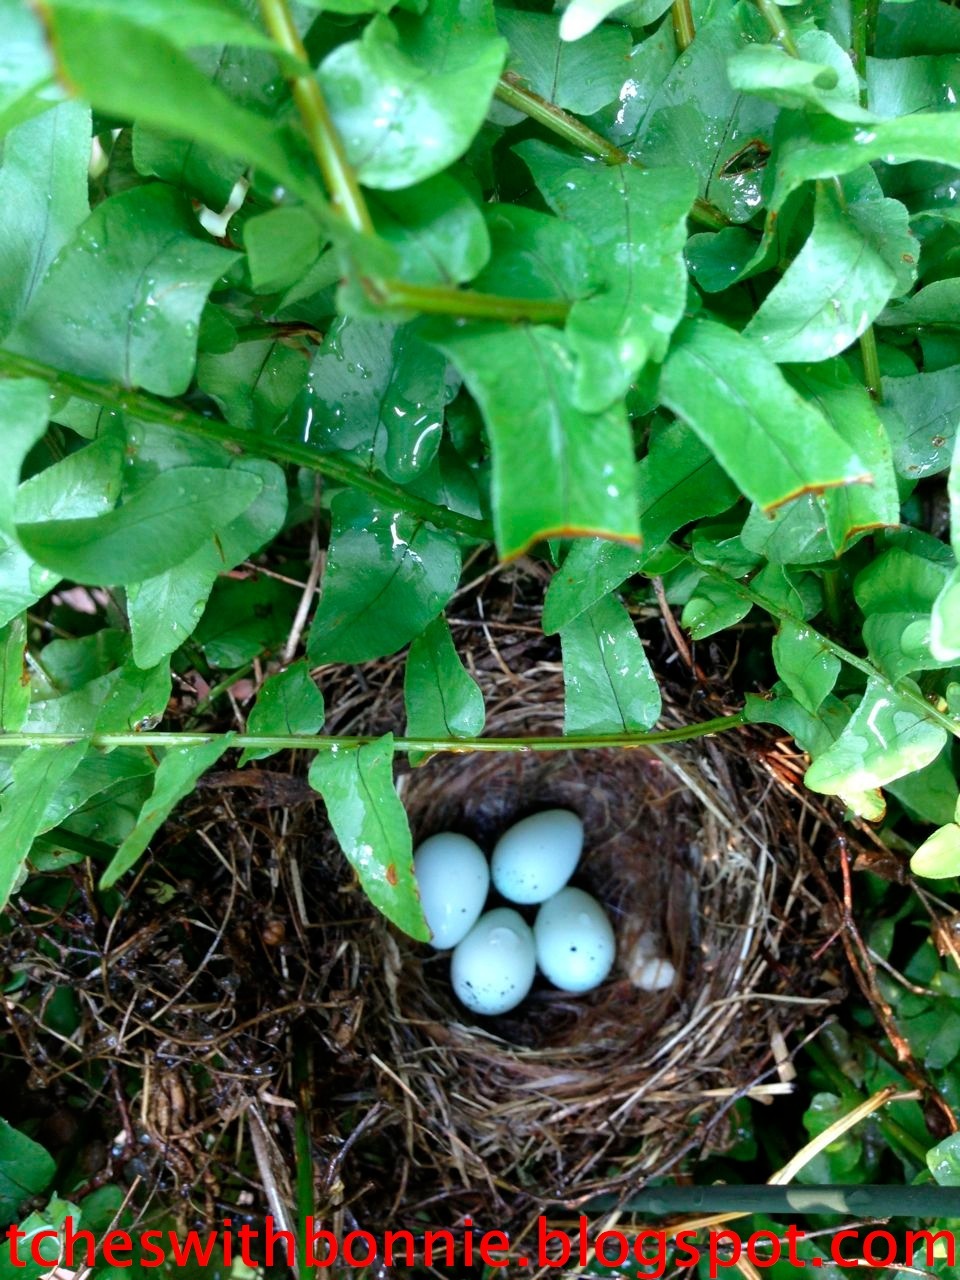
On to what is happening around the house.  LOTS!  First, while I was watering the 2 ferns in the front I saw this! 
Four little robin eggs.  There were 5 in the other fern.  But, I dropped that fern and the eggs scattered. And with all the work on the front of the house no one has seen any robins around.  Bummer. 
First this was dropped off. 

Then a chute was built to make it easy to get rid of debris.


And then a scaffolding was added.  Most of the guys go to work by scaling the scaffolding after the windows are taken out each morning.  Plus all the supplies are coming in through that window! 
Ready for work!  Except, there is also a blue porta potty right in front of the roll off container.  We've got a nice patriotic look going.  I wonder if it will still be there by the 4th of July? 
It's time to really get to work now that the work area is ready.  The first thing they did was cut a hole in the roof! 
YIKES! 

It eventually became a HUGE hole in the roof. 

That is a LOT of sunshine.  
That's all the photos I've got to share today.  Suffice it to say that by last night the windows were in and the roof was on and we are in fairly good shape if we get some rain... which may happen Monday. I'll be adding more photos as I can as the studio progresses.  

Happy Quilting All!