Thursday, January 21, 2016

Have You Tried This?

Even with my new Accuquilt Go I am still going to have to cut with rotary cutter and ruler -- think of the expense of all those dies?  I remember seeing a teacher  talk about cutting her strips this way and decided to try it again.  


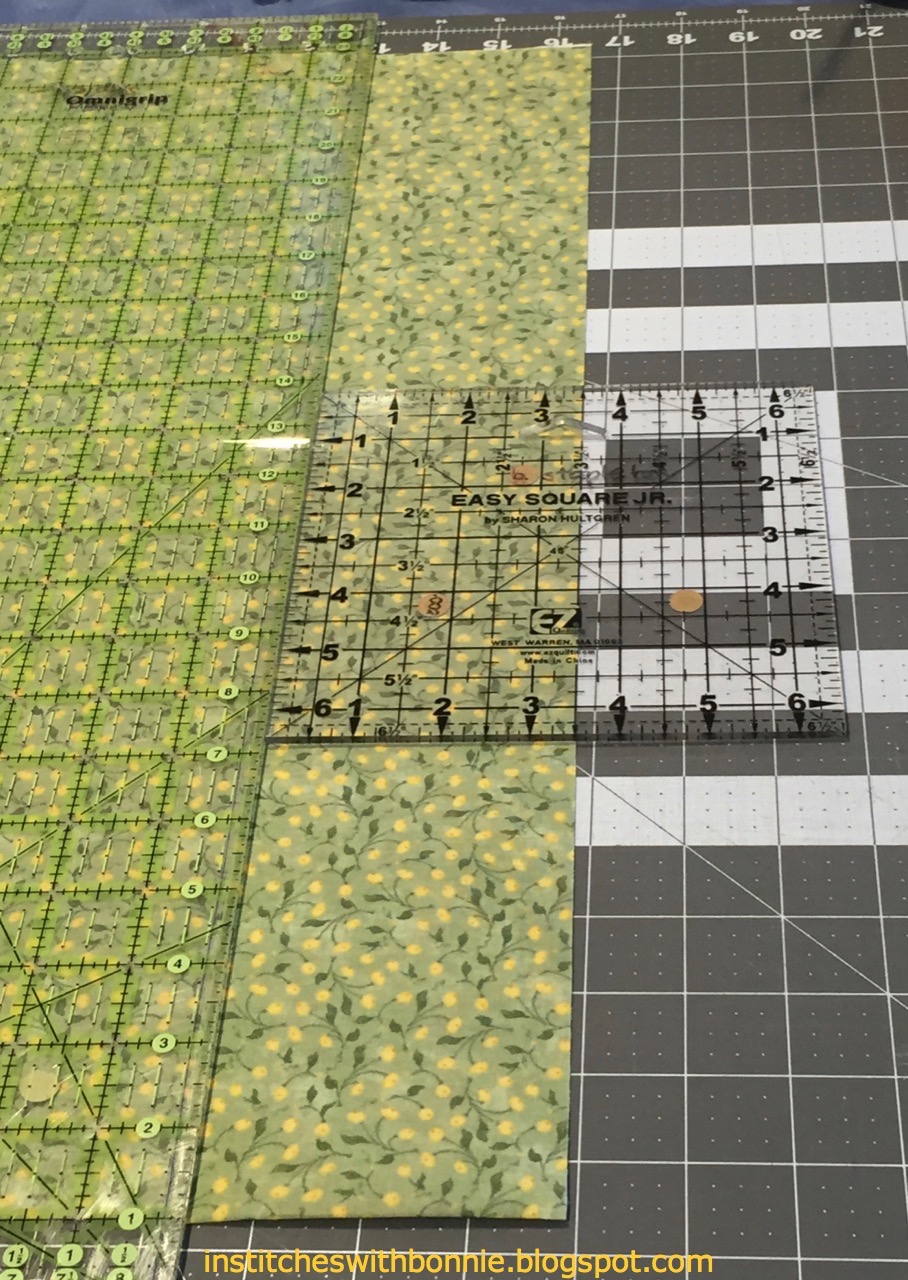
I was cutting 3 1/2" strips.  I have my large 8 1/2" ruler placed to the left of my fabric end.  Then I used a smaller ruler to actually measure the 3 1/2" strip.  Once I determined that the measurement was accurate at top and bottom, I removed the small ruler while carefully holding the large ruler steady.  And then it was time to cut. 
It worked like a charm!  It saved the step of flipping the fabric after I evened up the edge. I think I will use my 6 x 12" ruler from now on as it has a larger straight edge to align the large ruler.  Here's where these borders went to: 

Most of these fabrics with the exception of the cream background, the border and a few of the brick fabrics, were part of a bigger bag of fabrics I got at the last retreat for FCQ.  Someone had donated fabric to be used for a challenge.  I got a bag of (excuse me if you love these but) awful fabrics. Ugh.  Too busy. There were several color ways of hummingbirds, strawberries, raspberries and flowers. We had to use some of the fabric on either the front or the back.   I saw the Stacking Brick pattern at Jo's Country Junction and drew it in EQ to make it a bit bigger. (Easier to count how many bricks I needed to cut.) It was a snap to make.  All the rows are made the same. On the end of each row you add a square instead of a brick.  When you lay it out you flip the row so that the square is on the left, next one on the right... etc.  Tres easy!  

Back to the challenge fabrics. I didn't make much of a dent in my fabrics and I sure didn't want any leftovers.  So, I picked several untouched fat quarters and some of the leftovers from the blocks and pieced the backing.  I tried to put less busy fabrics next to the busy ones but honestly, there wasn't much I could do to calm it down.
First row done. 
Backing complete.
Hopefully it will be fine on the back.  I believe these quilts will be donated to Project Linus when completed.  Hopefully this one will be done to hang in the FCQ quilt show in April.  

Do you live in the Mid-Atlantic states?  Watch out then.  Here's the snowfall predictions for the storm that is moving in tomorrow.  Do you see Richmond down there?  We live a bit to the left of it.  About where the 3 to 6" turns into 6 to 12".  Our kids both live in the 12 to 24" area. Yuck.  Done that, been there and really don't want to do it again. 
So we are prepping our house and lives for a snowy weekend.  Gas is available for the small generator we have.  Water is available for drinking in case we don't want to run the generator for long periods of time. (We have a well.)   Food is available that doesn't have to be heated up.  Ice is packed into the freezers to help keep the food cold.  I keep charging the electronics so that I can have something to read on. (I have an old cell phone I only charge up when I will be somewhere that may not have electricity to recharge for a while.)  And, I've got lots of fabric I can cut up on my Go if the power does go out.  We have a gravel driveway so we don't have to clear that although, we probably won't be able to leave for a few days either.  Our streets get plowed early on because the local sheriff lives in the neighborhood.  Stay warm this weekend and sew to your heart's content! I'll be firing up Ruthie this morning to quilt some quilts today and tomorrow, hopefully. 

I'm linking up with Really Random Thursday, Let's Be Social, Needle and Thread Thursday and Can I Get a Whoop? which I'll add once it is up

Happy Quilting All! a href="http://www.mylivesignature.com" target="_blank">

Monday, January 18, 2016

Monday Meanderings 1-18-2016

After asking for ideas for this zigzag quilt here, I decided to see what fabric I had that might work.  I really don't want to buy new fabric for it.  Here are some of my attempts.
 UGH!

 Nope.

 Yuck.

 Maybe.

Most of these looked blah.  (You should have seen the splotchy blue I tried. Double Yuck!)  I'm leaning toward the red at the bottom.  Except, that is earmarked for pillow shams for my current bed quilt.  Never fear.  I have a bit brighter red that I think I will use once I actually proceed with this project.  It is a wide back so it will be a pain to cut into strips but I should also have enough to use as the backing too!  I'll keep you posted. 

Here's the goal info for last week and this week. 
January 11, 2015
Mail hats & FCQ Equilter’s block
Finish quilting rwb table runner postponed for later
Make 2 fleece hats (embroidered too)
Plan small quilt top for OMG for January
Start quilting first customer quilt didn’t happen

January 18, 2015
Finish January OMG quilt top
Make backing for Bricks quilt(from challenge fabrics)
Cut out & start sewing second challenge quilt
Finish sewing one or more little antique 9 patch quilts
Make more Sea Hawks blocks for FCQEQuilter

I'm linking up with Monday Making and Main Crush Monday. Check out all the Monday goodness!

Today I leave you with a black dog in the white snow.  (yep, we had snow all day yesterday although it was really light.) 

Happy Quilting All! 


Saturday, January 16, 2016

Some Days . . .

It was one of those days that you just don't want to have.  I've been quilting for over 30 years.  I know how to draft most patterns I see although I don't do it all that often.  Today I planned to work on my OMG (One Month Goal) quilt and some other blocks I need to finish. (you can view the blocks that are part of the OMG here.)  Here's my plan for the OMG: 


I don't use EQ7 very often so I was pleased with the way this one turned out when I drew it.  I checked my size and thought, ah, 6" finished block.  I can use my new Go cutter to cut 2 1/2" squares.  I cut all the squares for the 9 patch.  I made the first one up.  I pinned it on the design board with the stars and realized OOPS!  It was not the right size.  So, I started again.  Measured the small squares and thought... ok, 1 1/2" cut squares.  Let's go!  I cut out all I needed for the 4 blocks, made most of the blocks .  Um, er, the finished blocks were too small.  (Sounds suspiciously like Goldilocks and some bears, if you ask me.)  I really looked at the 2 blocks.  It finally dawned on me what the problem is.  Can you figure it out?  

Cue the music, I'm hoping for some California Dreaming from the Mamas and the Papas.    

Ok, we're back.  Do you know the problem?  The stars are 4 patches.  But the 9 patches, are, well, 9 patches. (Hum, that sounds odd. Why is an eight unit block is a 4 patch and a 9 unit block is considered a 9 patch, not a 3 patch?)  Basically there are 4 blocks of 1" each across the star blocks.  But the 9 patch would have 3 blocks of 1.33" if I wanted to keep the 9 patch.  This would have been fine if the blocks were 6" finished, but it's is a royal pain if it is 4" finished.  Why can't I be brilliant before I started cutting and sewing?

Can you hear it?  That giant rrrrriiippppp? That was me separating the 9 patches to resew as 4 patches. Here's the revised pattern. 
This one works fine as there are 4 - 1" (finished) patches in this block.  I'm making the green and beige block as 4 - 4 patches sewn together.  I can use the 1.5" squares and it will go together easily.   Needless to say, I quit after that little debacle. 

Do you have these problems where you think you're are being very careful and you've figured the block out only to find your brilliance wasn't so bright?  Tomorrow's another day and hopefully I'll do a lot better.  Sigh. 

I'm linking up with Can I Get a Whoop, Whoop? and Whomp! There It Is.  Check out these linky parties and you can see what folks are working on these days.   

Happy Quilting All!