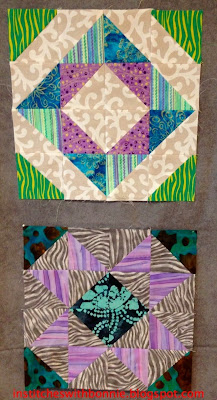
Right and Left
This
design is number 2406 in Barbara Brackman’s Encyclopedia of Pieced Quilt
Patterns. This is from Ladies Art Company which began publishing quilt patterns some time in the 1890s. This design was in number 195 which means it was
probably published anywhere from 1889 to 1895. Click here for a printable version of this block.
All of our previous blocks have used triangles that were
cut by cutting once across the diagonal of a block. The resulting blocks would then be sewn on the diagonal
which put the other two sides as either straight of grain or crosswise
grain. In other words, the bias
would be along the long seam.
Today I’m using triangles that would be considered part of quarter
square triangles. I actually have
a bunch of these but they are much to big to end up with a 6” finished square
so I cut these triangles to fit the required block size. The long side of the
triangle is on either the straight of grain or crosswise of grain. Having a non-bias edge on the outside maintains the
integrity of the block.
Cutting directions are for 6”
Fabric
|
Number
to cut
|
6”
|
Squares to make Triangles, 2 light and 2 dark
|
2 of each
|
4 ¼” squares, sub cut on the diagonal twice to
make 4 triangles.
|
Square
|
1
|
Cut 4 ¾” square. Remember this will be on the
diagonal.
|
When you cut the diagonals do not move your pieces until
after the last cut. The triangles
should look like this.
Here are the pieces that will make up this block.
Sew two short sides of the triangle together. When you sew the triangles be
consistent. In my case, I always
sewed with the dark side up. That
way all of the finished pieces were the same. (Ask me how I learned this!!)
Lay out the pieces to match the finished block. To get the
triangles unit in the center of the square fold the square in half
and finger press the center. Do it
again folding the opposite way.
Then, match the triangle seam to the finger pressed spot. Pin and sew, right
sides together. (Which, I assume you all know to do which is why I don’t mention
it much!)
I ironed
the seams toward the triangles on all sides.
I enjoyed centering the flower in the middle of this
block. I can imagine a lot of cute fabric highlighted in the center of this block. And, I was happy it wasn’t
all that hard of a block to make.
I can see more of these in my future.


